Why Your TikTok Video Looks Soft, and How to Measure the Quality Loss
Your video is compressed twice before a follower sees it: once by your export, and once by TikTok's re-encode after upload. Measuring both files shows which stage cost you the detail.
Updated August 31, 2026
The short answer: two places your video loses quality, and only one of them is TikTok
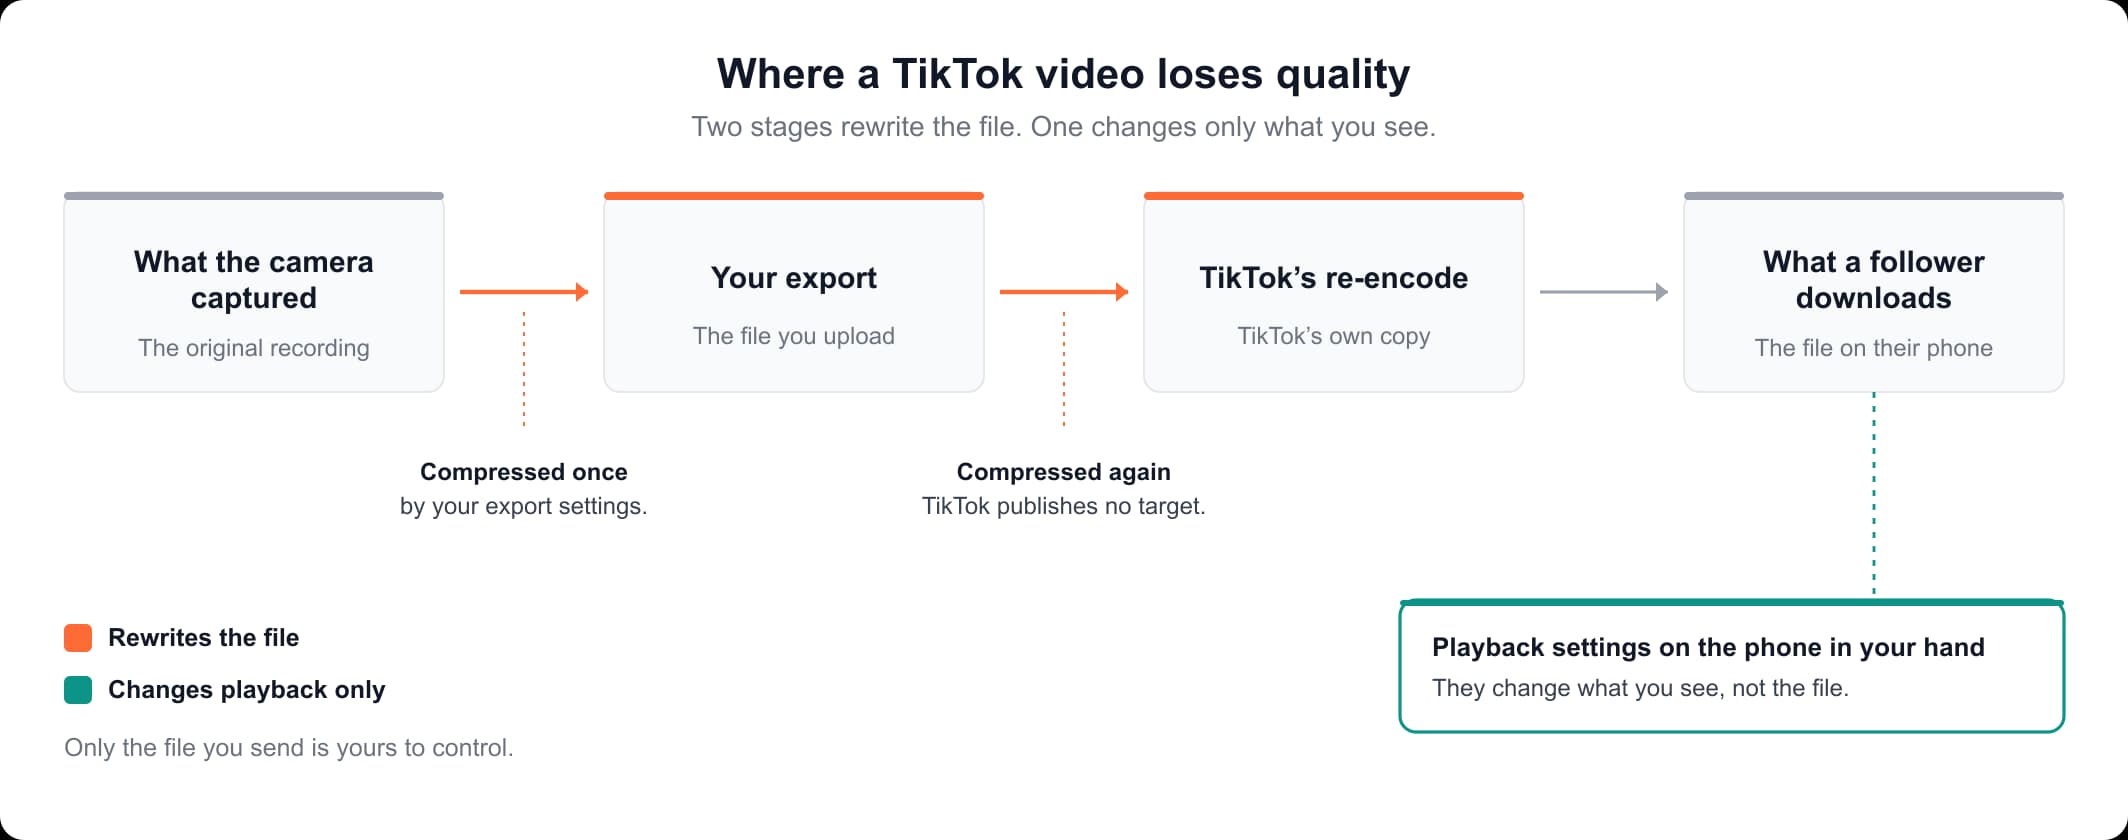
You cannot stop TikTok from reducing your video quality by flipping a switch, because every upload is re-encoded on the way into the feed. What you can find out is how much of the loss was TikTok's. A video that reaches a follower has been through two lossy stages: your device capturing and exporting the file, and TikTok re-encoding it after upload. A third thing, the playback settings on the phone in your hand, changes what you see without touching the file at all.
Re-encoding, also called transcoding, means TikTok does not store and serve the file you sent. It decodes your video and encodes a new one, and every re-encode of an already-compressed file throws away detail that nothing puts back. That is why "why are my TikTok videos blurry" is hard to answer from outside the company: TikTok publishes nothing about that step. No target bitrate, no output codec, no statement about what happens to a 4K upload.
So the first move is a measurement rather than a checklist of toggles. The fix for a thin export and the fix for a heavy re-encode are different fixes, and five minutes of arithmetic in the next section tells you which one you need.
How to check TikTok video quality on a video you already posted
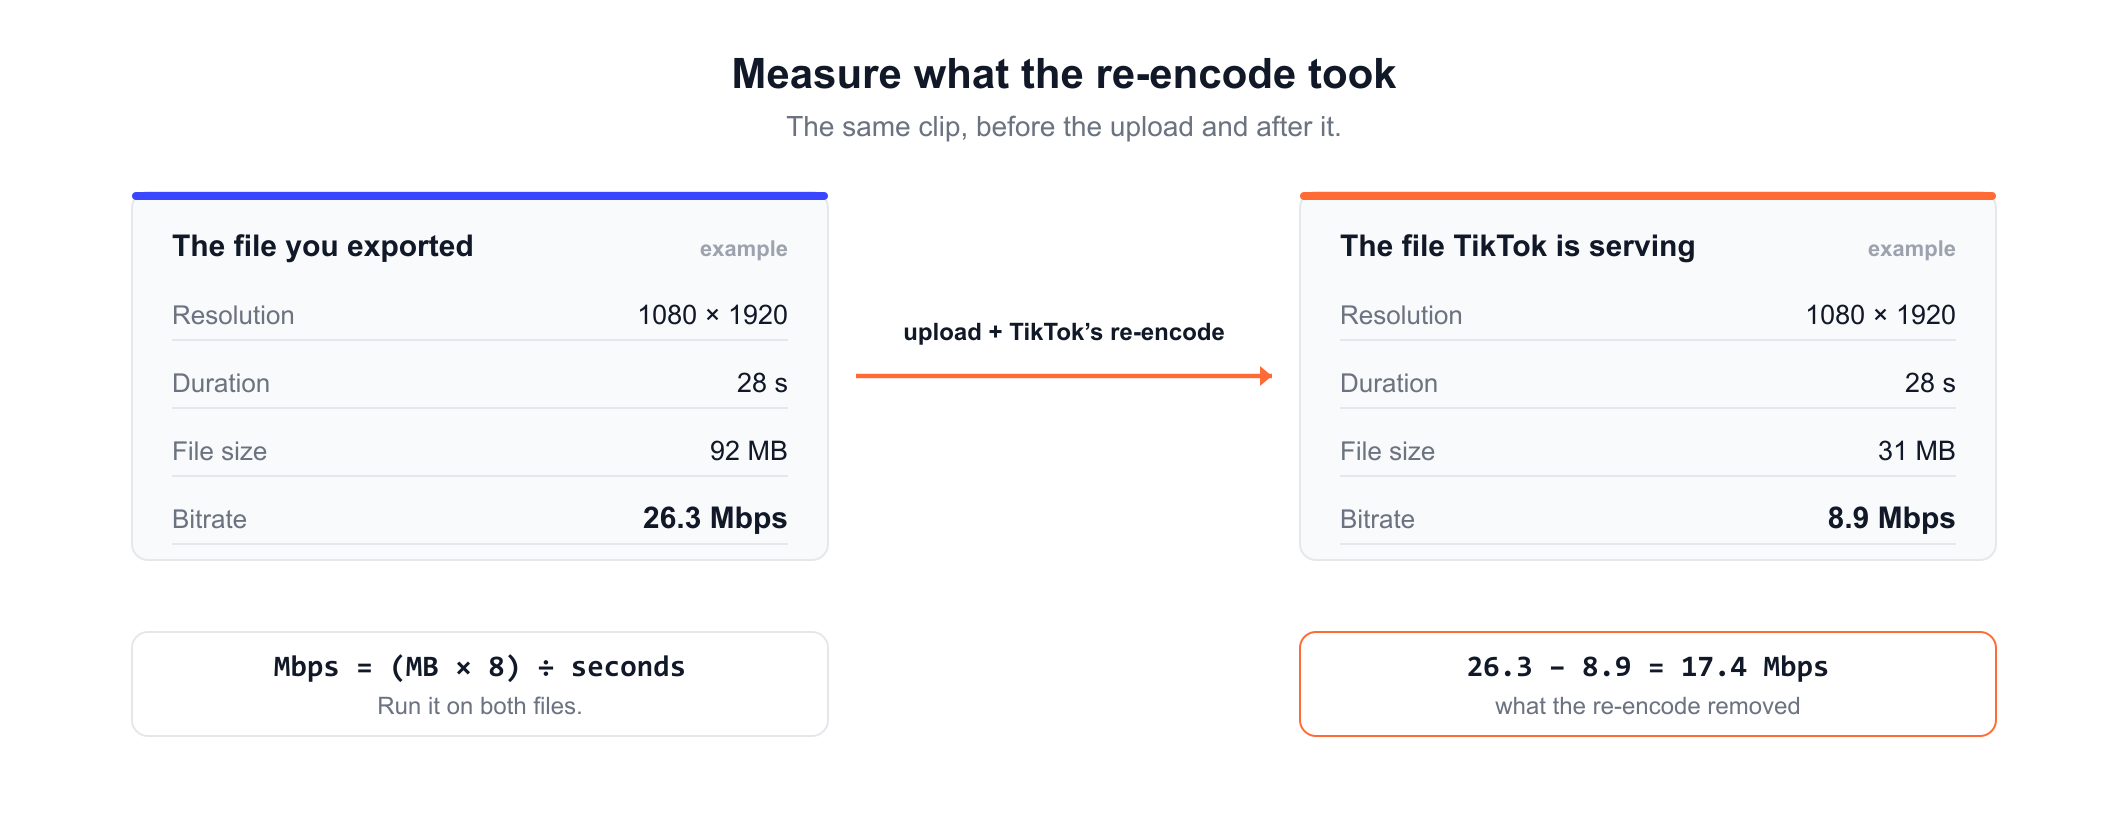
To check video quality on TikTok, put a number on both files: the one you exported and the one TikTok is now serving. That number is bitrate, the amount of data the file spends on each second of video, counted in megabits per second (Mbps). Bitrate decides how much detail survives compression, and it is the one figure no dropdown in the app will show you. A file's size and duration are enough to work it out.
- Open the file you exported. Read its resolution, duration and file size. In VLC that is Tools, then Codec Information. On macOS, select the file and choose Get Info. On Windows, right-click it, choose Properties, then open the Details tab.
- Turn those into a bitrate.
Mbps = (file size in MB x 8) / duration in seconds. A 92 MB clip that runs 28 seconds works out at 26.3 Mbps. Write your number down. - Fetch the version TikTok is serving. Copy the link to your own post, paste it into our TikTok video downloader and press Download. You get a list of the versions available for that video, each row naming a file type and a quality label with its own download link. Save the highest-quality row. The list gives a quality label rather than a bitrate, so the number has to come from the file itself.
- Run the same arithmetic on the downloaded file. Read its size and duration, apply the formula again, and two numbers now describe the same clip before and after TikTok.
Both figures are averages, so a busy shot inside an otherwise quiet clip carries more than the average shows. The arithmetic behind them is worked through in our guide to upload bitrate.
Read the two numbers against each other rather than against anyone's recommended figure. A low first number means the export was already thin, and no setting inside TikTok recovers detail that was never in the file. A second number far below the first means the re-encode took it, and what you control is the file you send next and the upload-side setting below. Two numbers that sit close together mean the file is fine and what you are looking at is playback on your own phone.
What TikTok actually publishes about video specs
Resolution is not quality, and the table below gets misread without that. A 1080x1920 export at a low bitrate looks worse than a 720x1280 export at a high one, because resolution is the size of the grid and bitrate is how much data fills it. Every TikTok video spec below is traceable to a document TikTok publishes, covering aspect ratio, resolution, format, bitrate, file size and duration. All of it comes from documents written for advertisers and developers, not for creators posting from the app, and every figure is a floor rather than a target.
| Spec | What TikTok publishes | Where it says so | What it does not mean |
|---|---|---|---|
| Aspect ratio and resolution | "Vertical (recommended): 9:16, more than or equal to 540*960px", with 16:9 at 960*540px and 1:1 at 640*640px. Separate creative guidance says "shooting at least 720P resolution". | TikTok Ads Manager: In-Feed Ads specifications and Creative best practices | Not an export target. Both figures are floors for an ad. |
| Accepted file formats | The upload endpoint accepts "video/mp4, video/quicktime, video/webm". The ad spec lists a different set: ".mp4, .mov, .mpeg, .3gp .avi". | TikTok Content Posting API reference and the ad spec above | Two lists for two pipelines. Neither covers the phone app, and neither mentions GIF. |
| Bitrate | "More than or equal to 516 kbps" | The In-Feed Ads specifications | Not a recommendation. It is the lowest bitrate an ad may carry. |
| File size | "Less than or equal to 500 MB" | The In-Feed Ads specifications | A ceiling for ad creative, not for an ordinary post. |
| Duration | "up to 10 minutes" | The In-Feed Ads specifications | The limit for that ad format. |
Not one of those documents gives a recommended upload bitrate for an ordinary post. A range of 8 to 15 Mbps is repeated across the guides on this subject as TikTok's own figure. It appears in no document TikTok publishes, and the guides that carry it cite no source for it. That absence is the useful part: because TikTok will not say what its encoder aims for, the only number that describes your video is the one you measure off it.
TikTok video quality settings: which side of the upload each one sits on
TikTok video quality settings fall into two groups, and mixing them up is why so much advice about them fails. Upload-side settings change the file TikTok receives from you. Playback-side settings change what a video looks like on the phone you are holding. A control on your device cannot touch a stranger's download.
| Setting | Which side it is on, and what it can and cannot change |
|---|---|
| The high-quality upload toggle, labeled "Allow high-quality uploads" or "Upload HD" | Upload-side. It is meant to change the file TikTok receives. TikTok documents it nowhere. The guides that describe it place it on the caption screen. |
| Data Saver | Playback-side. It sits with the app's cellular data and cache controls on your phone and changes how much video your phone downloads to play. It cannot change the copy anyone else receives. |
| Clearing the app's cache | Playback-side. It changes what your phone has stored, not what TikTok stored when it processed your upload. |
| Your camera and export settings, before TikTok is involved | Upload-side, and the only part of the chain entirely under your control. See the next section. |
The upload toggle is worth turning on if your app has it. Both label variants are in circulation, and the wording and the placement move between app versions, so look on the caption screen rather than following a menu path copied from a guide. The toggle can only change the file you send. If your two numbers came out close, it has nothing left to fix.
Data Saver is the setting that gets listed as a cure for a blurry upload, and it cannot be one. It runs on your phone and changes what your phone downloads in order to play a video. Nothing on your phone takes part in what a follower's phone downloads from TikTok's servers. If your posted clip looks soft only on your own screen and your two numbers came out close, playback is where to look: turn Data Saver off and open the same post on another device.
Before TikTok sees it: what your export decides
Half of the result is settled before TikTok is involved, and TikTok never gets a chance to improve that half. Its encoder works from whatever you hand it: a clean, generously encoded file gives it detail worth keeping, and a thin one gives it very little. This half is yours, and a low first measurement sends you straight to it.
The trap is the second encode. A file compressed once loses again every time it is compressed after that, so a clip that was exported, uploaded somewhere, downloaded and then posted to TikTok arrives with two generations of loss before TikTok adds a third.
- Record at the highest setting your device offers. Resolution and frame rate are decided at capture, and no later step adds detail the camera never recorded.
- Export once, from the original. Every extra encode between the camera and the upload costs picture, and none of it can be recovered later.
- Spend the file on bitrate rather than on the resolution number. Given a choice, a 1080x1920 export at a high bitrate beats a 4K export squeezed into the same file size.
Because TikTok publishes no bitrate target, the only sourced reference point for a 1080-line vertical clip comes from a platform that does. Google's recommended upload encoding settings for YouTube ask for an MP4 container with H.264 video, and put 1080p at 8 Mbps at standard frame rates and 12 Mbps at high ones. That is Google's published figure for YouTube, not TikTok's. TikTok has published nothing comparable, so use it as a sense of what a healthy 1080-line export weighs, not as a TikTok setting. Our breakdown of those figures has the rest of the table.
If your file is not an MP4
TikTok's Content Posting API reference names three content types its upload endpoint accepts: "video/mp4, video/quicktime, video/webm". MP4 is still the one to send: almost every phone, camera and editing program writes it by default. The container is the box the extension names, and the codec is what compressed the picture inside it, a split covered in our guide to the best video format for the file you already have. Changing the box does not change the picture, so converting a file settles whether TikTok will take it, not how sharp it is. Our converters change the container and the codec and nothing else: there is no resolution, bitrate or quality control in them, and no conversion adds detail. Three kinds of file are worth converting before you try to post them.
- A WebM screen recording. The posting API lists WebM, the ad spec does not, and TikTok documents nothing about what the phone app accepts, so convert it with our WebM to MP4 converter.
- An old .avi file off a camera or a hard drive. The ad spec lists .avi and the posting API does not, so our AVI to MP4 converter is the safe move.
- An animated GIF. GIF is an image format carrying a sequence of frames, not a video format, and it appears in neither TikTok document, so our GIF to MP4 converter turns it into a file the pipeline lists.
What will not help
Four of the obvious next moves cost time and change nothing, each for a reason that points at what would have worked instead.
- Deleting the post and uploading the same file again. The same file meets the same encoder, so the second copy has no reason to differ from the first.
- Uploading a copy you saved from another app or another platform. That file has already been encoded at least twice, so it hands TikTok's encoder a worse source than the one in your camera roll.
- Pushing the export bitrate far past what the source can fill. Bitrate preserves detail rather than creating it, and a grainy low-light clip exported at an enormous bitrate is a large file with the same soft picture in it.
- Any tool that promises to put the detail back afterwards. A converter changes the container and the codec, the box and the compression, and nothing returns what a re-encode has already thrown away.
How to check TikTok video quality on your own post
Five steps to two numbers: what you exported, and what TikTok is serving.
Find the file you exported
Read its resolution, duration and file size. In VLC that is Tools, then Codec Information. On macOS, select the file and choose Get Info. On Windows, right-click it, choose Properties, then open the Details tab.
Turn that into a bitrate
Multiply the file size in megabytes by 8, then divide by the duration in seconds. The result is the average bitrate in Mbps. Write it down.
Fetch the posted version
Copy the link to your TikTok post, paste it into the downloader and press Download. Save the highest-quality row the list offers.
Do the same arithmetic on the downloaded file
Two numbers now describe the same clip, one before TikTok processed it and one after.
Act on the difference, not on a checklist
A low first number means the export was already thin, and the fix is your export. A large gap means the re-encode took it, and the fix is the upload-side toggle plus a cleaner source. Two close numbers mean the file is fine and what you are seeing is playback.
Frequently asked questions
Read more articles

The YouTube Bitrate to Set Before You Export

The Best Video Format for the File You Already Have

Downloading a Song From YouTube: Offline Play or a File You Keep